Thwarting the Terrapin SSH Attack (Mitigation)

The Terrapin Attack is the biggest SSH vulnerability that we have seen in decades.  Terrapin splices TCP sequence numbers to truncate SSH extension negotiation. While this is a concern, effective exploitation of this vulnerability is very difficult, and mitigation is very easy! The paper notes that AES-GCM is not vulnerable to the attack:

AES-GCM (RFC5647) is not affected by Terrapin as it does not use the SSH sequence numbers. Instead, AES-GCM uses the IV obtained from key derivation as its nonce, incrementing it after sending a binary packet. In a healthy connection, this results in the nonce being at a fixed offset from the sequence number.

The original Encrypt-and-MAC paradigma from RFC4253 protects the integrity of the plaintext, thus thwarting our attack, which yields one pseudorandom block during decryption.

This means you can simply use the AES-GCM cipher in SSL communication by configuring your hosts to default to that protocol. The AES-GCM cipher has been supported in SSH since version 6.2 so pretty much all supported distributions going back to at least 2014 have an easy mitigation.

Mitigating on the server

Newer Servers that are using `update-crypto-policies` (RHEL, Alma, Rocky, Oracle, newer Ubuntu and Debian)

Newer operating systems that provide the command update-crypto-policies, create a new policy file and activate it.  You can modify `DEFAULT` to something different if you are using a different policy, but “DEFAULT” works for most systems.

# cat /etc/crypto-policies/policies/modules/TERRAPIN.pmod
cipher@ssh = -CHACHA20*
ssh_etm = 0

# update-crypto-policies --set DEFAULT:TERRAPIN
Setting system policy to DEFAULT:TERRAPIN
Note: System-wide crypto policies are applied on application start-up.
It is recommended to restart the system for the change of policies
to fully take place.

Older Servers are not using `update-crypto-policies`

Simply add this to the bottom of /etc/ssh/sshd_config:

Match All
Ciphers aes256-gcm@openssh.com

Note that Match all is added in case you have other match blocks. Of course, if you prefer, you can exclude the Match all line and insert the cipher above any match blocks so that it is a global option.

Forcing aes256-gcm is a bit of a hammer, it certainly works but may be more than you need.  Ultimately only Chacha20 and ETM-based MACs need to be disabled, so modify this as you see fit.

Testing Server Mitigation

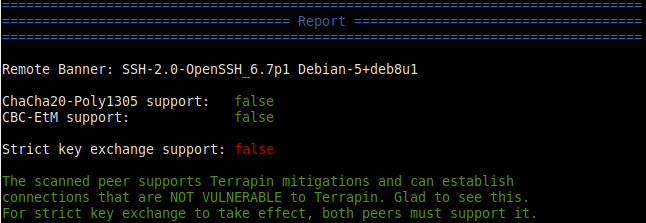
The Terrapin research team has published a scanning/test tool.  There is GitHub page to compile it yourself, or pre-compiled binaries for the most common OS’s are available on the releases page.  The result should look something like this.  “Strict key exchange support” is unnecessary if the vulnerable ciphers are disabled.  As you can see, it says “NOT VULNERABLE” in green:

Output of a successful terrapin mitigation

Mitigating on the client

This can be done per user or system-wide.  To configure it for all users on a system, add this to the bottom of /etc/ssh/ssh_config:

Ciphers aes256-gcm@openssh.com

To configure it for a single user, add this to the top of the SSH configuration in your home directory (~/.ssh/config)

Ciphers aes256-gcm@openssh.com

Mitigating Windows SSH Clients

Unfortunately, the following Windows packages do not support AES-GCM and cannot be mitigated in this way:

If you use any of these then it would be a good idea to switch to an SSH client that supports AES-GCM.

Windows clients that support AES-GCM

Here are a few Windows clients that do support AES-GCM, in alphabetical order, by second letter:

The Fine Print

The examples above are one (very simple) way of dealing with this.  Ultimately you need to disable the ETM and ChaCha20 ciphers.  You can see what is configured in ssh as follows:

]$ ssh -Q mac|grep etm
hmac-sha1-etm@openssh.com
hmac-sha1-96-etm@openssh.com
hmac-sha2-256-etm@openssh.com
hmac-sha2-512-etm@openssh.com
hmac-md5-etm@openssh.com
hmac-md5-96-etm@openssh.com
umac-64-etm@openssh.com
umac-128-etm@openssh.com
]$ ssh -Q cipher|grep -i cha
chacha20-poly1305@openssh.com

-Eric

Recover Deleted MegaRAID Volume with Linux

Recently a customer with a 4-disk RAID5 array backed by a MegaRAID controller came to us because their RAID volume was missing. The virtual disk (VD) exported by the RAID controller had disappeared!

The logs indicated that it was deleted, but as far as we can tell no one was on the system at the time. Maybe this was a hardware/firmware error, or user error, but either way the information that defines the RAID volume was no longer available.

We were able to use the Linux RAID 5 module to recover the missing data!  Read on:

Hardware RAID Volumes

When a volume is deleted, the RAID controller removes the volume descriptor on the physical disks but it does not destroy the data itself; the data is still there. There are ways to recover the data using the controller itself. MegaRAID volume recovery documentation suggests that you to re-create the volume using the same parameters and disk order as the original RAID. For example, if you know that it was a 256k stripe then you can recreate the array with the same disk ordering and same stripe size. However, for a raid volume that has been in service for years, how can this possibly be known unless someone wrote it down?

While the controller would then stamp the disks with a new header and leave the data alone, theoretically there will be no data loss and the array will continue as it had originally. This procedure comes with quite a bit of risk. if the parameters are off then you can introduce data corruption. Thus, you should back up each disk individually as a raw full disk image. Unfortunately this takes a long time and as far from convenient. If you get the parameters wrong then the data should be restored before trying again to guarantee consistency, and that takes even longer.

Guarantee Recovery Without Data Loss

Recovery in place was the only option because it would take too long to do full backups during each iteration. However, we also had to guarantee that the recovery process would not introduce failures that could lead to data corruption. For example, if we had chosen a 64k stripe size but it was formatted with a 256k stripe size, then the data would be incorrect. While it is probably safe to try multiple stripe sizes without initialization by the raid controller, there is the risk of technician error causing data loss during this process.

You should always avoid single-shot processes with the risk of corrupting data. In this case terabytes of scientific data were at riskand I certainly did not trust the opaque behavior of a hardware raid controller card that might try to initialize an array with invalid data when I did not want it to. Using a procedure provided by the RAID controller making several attempts, each with an additional risk of losing data, is unnerving to say the least!

I would much prefer a method that is more likely to succeed, and certainly with the guarantee that it is impossible to lose data. When working with customer data it is imperative that every test we make along the way during the process of data recovery is guaranteed not to make things worse.

How to use Linux for RAID Recovery

This is where Linux comes in: using the Linux loopback driver we can require read-only access to the disks. By using the Linux dm-raid5 module we can attempt to reconstruct the array by guessing it’s parameters. This allows us a limitless number of tries and the guarantee that the process of trying recover the data never cause corruption, whether or not it succeeds.

First we started by exporting the disks on the RAID controller as jbod volumes. This allows Linux to see the raw volumes as they were without being modified by the RAID controller firmware:

storcli64 /c0 set jbod=on

Once the drives are available to the operating system as raw disks, we used the Linux loopback driver to configure them as read only volumes.  For example:

losetup --read-only /dev/loop0 /dev/sdX
losetup --read-only /dev/loop1 /dev/sdY
losetup --read-only /dev/loop2 /dev/sdZ
losetup --read-only /dev/loop3 /dev/sdW

Now that the volumes are read only we can attempt to construct them using the Linux RAID 5 device mapper target. There are several major problems:

  1. We do not know the stripe size
  2. We do not know the on-disk format used by the RAID controller.
  3. Worse than that, we do not know the disk ordering that the RAID controller selected when it built the array.

This is makes for quite a few unknown variables–and only one combination will be correct. In our case there were only 4 disks so the possible disk ordering is 24 (4! = 4*3*2*1 = 24).

Now it is a matter of trial and error and we can use the computer to help us a bit to minimize the amount of typing we have to do, but there is still manual inspection to review and make sure that the ordering it found is useful and correct:

[0,1,2,3], [0,1,3,2], [0,2,1,3], [0,2,3,1], [0,3,1,2], [0,3,2,1],
[1,0,2,3], [1,0,3,2], [1,2,0,3], [1,2,3,0], [1,3,0,2], [1,3,2,0],
[2,0,1,3], [2,0,3,1], [2,1,0,3], [2,1,3,0], [2,3,0,1], [2,3,1,0],
[3,0,1,2], [3,0,2,1], [3,1,0,2], [3,1,2,0], [3,2,0,1], [3,2,1,0]

We permuted all possible disk orderings and passed them through to the `dm-raid` module to create the device mapper target:

dmsetup create foo --table '0 23438817282 raid raid5_la 1 128 4 - 7:0 - 7:1 - 7:2 - 7:3'

For each possible permutation, we used `gfdisk` to determine if the partition table was valid and found that disk-3 and disk-1 presented a valid partition table if they were the first drive in the list; thus, we were able to rule out half of the permutations in a short amount of time:

gdisk -l /dev/foo
...
Number Start (sector) End (sector) Size Code Name
1 2048 23438817279 10.9 TiB 0700 primary

we did not know the exact sector count of the original volume, so we had to estimate based on the ending sector reported by gdisk. We knew that there were 3 data disks so the sector count had to be a multiple of three.

The next step was to use the file system checker (e2fsck / fsck.ext4) to determine which permutation has the least number of errors. Many of the permutations that we tested fail the minute immediately the file system checker did not recognize the data at all. However, in a few of the permutations the file system checker understood the file system enough to spew 1000s of lines of errors on the screen. We knew we were getting closer, but none of the file system checks seemed to complete with a reasonable number of errors. This caused us to speculate that our initial guess of a 64k stripe size was incorrect. The next stripe size we tried was 256k and we began to see better results. Again many of the file system checks failed altogether but the file system checker seems to be doing better on some of the permutations. however, it still was not quite right. We had only been trying the default raid5_la module format, but the dm-raid module has the following possible formats:

  • raid5_la RAID5 left asymmetric – rotating parity 0 with data continuation
  • raid5_ra RAID5 right asymmetric – rotating parity N with data continuation
  • raid5_ls RAID5 left symmetric – rotating parity 0 with data restart
  • raid5_rs RAID5 right symmetric – rotating parity N with data restartwe added a 2nd loop to test every raid format for every permutation and when it reached raid5_ls on the 23rd permutation, the file system checker became silent and took a very long time. Only rarely did it spit out a benign warning about some structure problem that it found which was probably already in the valid RAID array to begin with. We had found the correct configuration to recover this raid volume!While we had to figure this out initially by trial and error using a simple Perl script to discover the configuration, you know that the MegaRAID controller uses the raid5_ls RAID type. This was the correct configuration for our drive:
  • RAID disk ordering: 3,2,0,1
  • RAID Stripe size: 256k
  • RAID on-disk format: raid5_ls – left symmetric: rotating parity 0 with data restart

Now that the raid volume was constructed we wanted to test to make sure it would mount and see if we can access the original data. Modern file systems have journals that will replay at mt time and we needed to keep this read only because a journal replay of invalid data could cause corruption. Thus, we used the “noload” option while mounting to prevent replay:

mount -o ro,noload /dev/foo /mnt/tmp

The volume was read only because we used a read-only loopback device, so it was safe, but when trying to mount without the noload option it would refuse to mount because the journey journal replay failed.

Automating the Process

whenever there is a lot of work to do, we always do our best to automate the process to save time and minimize user error. Below you can see the Perl script that we used to inspect the disk.

The script does not have any specific intelligence, it just spits out the result of each test for human inspection; of course it needs to be tuned to the specific environment. All tests are done in a read-only mode and loopback devices were configured before running the script.

When the file system checker for a particular permutation would display 1000s of lines of errors and we would have to kill that process from another window so it would proceed and try the next permutation. In these cases there was so much text displayed on the screen that we would pipe the output through less or directed into a file to inspect it after the run.

This script is for informational use only, use it at your own risk! If you are in need of RAID volume disk recovery on a Linux system than we may be able to help with that. Let us know if we can be of service!

#!/bin/perl

#   This program is free software; you can redistribute it and/or modify
#   it under the terms of the GNU General Public License as published by
#   the Free Software Foundation; either version 2 of the License, or
#   (at your option) any later version.
# 
#   This program is distributed in the hope that it will be useful,
#   but WITHOUT ANY WARRANTY; without even the implied warranty of
#   MERCHANTABILITY or FITNESS FOR A PARTICULAR PURPOSE.  See the
#   GNU Library General Public License for more details.
# 
#   You should have received a copy of the GNU General Public License
#   along with this program; if not, write to the Free Software
#   Foundation, Inc., 59 Temple Place - Suite 330, Boston, MA 02111-1307, USA.
#
#   Copyright (c) 2023 Linux Global, all rights reserved.

use strict;

my @p = (
	[0,1,2,3], [0,1,3,2], [0,2,1,3], [0,2,3,1], [0,3,1,2], [0,3,2,1],
	[1,0,2,3], [1,0,3,2], [1,2,0,3], [1,2,3,0], [1,3,0,2], [1,3,2,0],
	[2,0,1,3], [2,0,3,1], [2,1,0,3], [2,1,3,0], [2,3,0,1], [2,3,1,0],
	[3,0,1,2], [3,0,2,1], [3,1,0,2], [3,1,2,0], [3,2,0,1], [3,2,1,0]);

my $stripe = 256*1024/512;
my $n = 0;

foreach my $p (@p)
{
        next unless $p->[0] =~ /3|1/;

        for my $fmt (qw/raid5_la raid5_ra raid5_ls raid5_rs raid5_zr raid5_nr raid5_nc/)
        {
                activate($p, $fmt);
        }
        $n++
}

sub activate
{
        my ($p, $fmt) = @_;

        system("losetup -d /dev/loop7; dmsetup remove foo");
        print "\n\n========= $n $fmt: @$p\n";

        my $dmsetup = "dmsetup create foo --table '0 23438817282 raid $fmt 1 $stripe "
               . "4 - 7:$p->[0] - 7:$p->[1] - 7:$p->[2] - 7:$p->[3]'";
        
        print "$dmsetup\n";
        system($dmsetup);
        system("gdisk -l /dev/mapper/foo |grep -A1 ^Num");
        system("losetup -r -o 1048576 /dev/loop7 /dev/mapper/foo");
        system("file -s /dev/loop7");
        system("e2fsck -fn /dev/loop7 2>&1");
}
 

How to reset your root password!

From time to time I am asked how to set reset the root password on a Linux server when you get locked out. Obvious for security reasons you can’t to do this remotely, but it is pretty easy to do if you have physical access.

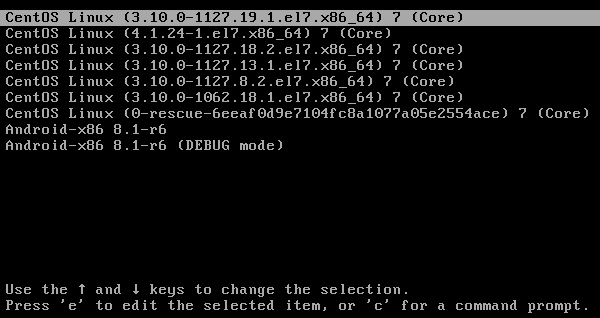
First, reboot the system and interrupt the grub bootloader that looks like this by pressing ‘e’. In this example we are booting from CentOS, but it works for pretty much any modern Linux distribution (SuSE, Debian, Ubuntu, etc), because they all use grub:

 grub bootloader interface

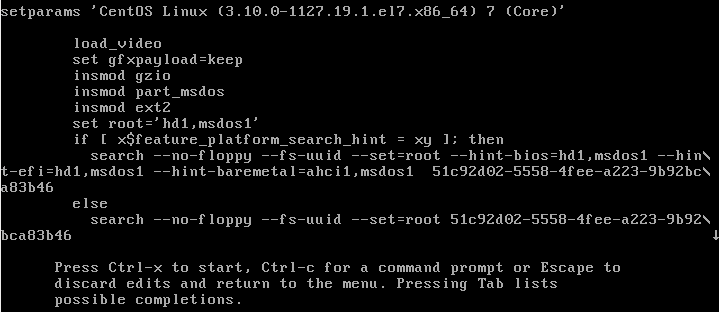
The when you press ‘e’ it will display a edit screen like this.  If you are prompted for a password when you press ‘e’ then your system administrator has disabled editing the bootloader configuration.   It is still possible to reset the root password if your bootloader his password it, but you will need to boot off of a rescue disk to do it.

 grub edit menu

Arrow down to the first section/line that starts with ‘linux16’ or ‘linuxefi’ or ‘linux’. it usually looks something like this (yes, it is a big long single line):

linux16 /vmlinuz-3.10.0-1127.19.1.el7.x86_64 root=/dev/mapper/centos-root ro rd.lvm.lv=centos/swap vconsole.font=latarcyrheb-sun16 rd.lvm.lv=centos/root crashkernel=auto vconsole.keymap=us biosdevname=0 net.ifnames=0 rd.auto=1 LANG=en_US.UTF-8

Add this to the end of that line; this is a temporary change to the bootloader that will exist only for this reboot:

init=/bin/bash

It should look something like this:

linux16 ... init=/bin/bash

Then press control-x to boot and eventually it will give you a bash prompt. When it does, run the following commands:

# mount -o remount,rw /
# passwd root
<change the password>
# mount -o remount,ro /
# echo b > /proc/sysrq-trigger

The last line will reboot the system. That should do it! Now you should be able to log in with your new root password.

-Eric

Docker or KVM: Which is Right for You?

Over the years there have been many different technologies to isolate workloads. Isolation is important for security because if one workload is compromised, and they are not isolated, then others can be affected. In today’s ecosystem, there are two predominant forms of workload isolation: containers and virtual machines.

Containers

Containers are similar to chroot jail in that all of the programs running within the container are executed in a way that they believe they have their own root file system. Linux namespaces allow the container to have its own process ID space, so `init` can be process ID 1, whereas, with chroot jails, the namespace was shared, so processes in the jail could not have a process ID of 1 since the host OS `init` process was already using process ID 1.

Containers share the same kernel and they do not have direct access to hardware resources.


Virtual Machines

Virtual machines are an emulated hardware environment provided by KVM. They boot their own kernel, have their own disks and attach network devices. If a user has full control over

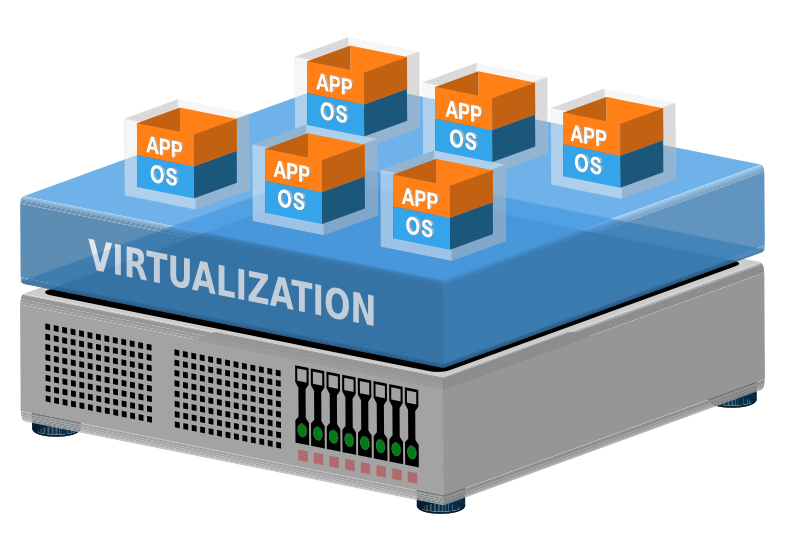
a virtual machine, then they can install any operating system they wish. Because the hardware is virtualized and running a separate kernel, virtual machines provide greater isolation than containers since they do not share the same kernel. The isolation is provided by hardware optimizations implemented in silicon by CPU manufacturers. This makes

it more difficult to escape a virtual machine environment than a container environment. You might ask: But what about branch prediction attacks, like Spectre?

In this case, branch prediction attacks equally affect containers and virtual machines so we can exclude that as a consideration for choosing containers or virtual machines.

Root File System

In practice, the operating systems running within these isolation technologies both operate from their own root file systems. Traditionally this was a complete distribution installation, however, that has changed in a way that hinders security and increases the difficulty of systems administration. There is a trend of “turn-key” operating system deployments, especially in Docker. If you want a particular application, let’s say, a web server running Word Press, then you simply run a few short commands and your Word Press server is up and running. This makes it easy to install for the novice user, but there is no guarantee that the Docker environment is up to date.

Further compounding container deployment security is the fact that some containers do not have a complete root file system and administrators cannot log in at all. Some would say this is good for security, but this type of monolithic container is still subject to the increasing likelihood of new attack vectors against an aging codebase. If a vulnerability does come along, then the monolithic container can become compromised. Since it can be difficult to log into this kind of container, it is harder to inspect what is happening from within the environment– and even if you can log in, the installation is so minimal that the toolset for inspecting the problem is not available, and the deployment may be so old that even if the container includes a package manager like Yum or APT, the distribution repositories may have been archived and are no longer available without additional effort.

Container intrusions can often be inspected from the outside using a privileged installation with configurable tooling, but the security issues and increased difficulty of maintenance are a counterindication for today’s containerized counter culture.

Our recommendation is always to install a long-term support release of a well known distribution in a virtual machine instead of a container. As a full virtual machine, not only do you get increased isolation, vendor updates, and a better security life cycle, but you also get increased management tooling such as live migration, full block device disks that can be cloned and mounted on other systems or snapshotted with easy rollback.

If you must use containers for your environment, then please use a normal OS distribution, configure security updates and email notifications and centralized logging. This will go a long way to making the system maintainable in the future and save you support costs.

If you are interested in learning more, then call us for a free consultation, so we can help work out what is best for your organization.

-Eric

RedHat/CentOS/RHEL 7 does not copy mdadm.conf into Dracut

Force MD and LUKS Auto-Detection

There is a bug in RedHat 7 releases for some systems when md is used that prevents booting. For some reason it does not copy mdadm.conf into the initrd generated by dracut. The fix recommended on the bug page (https://bugzilla.redhat.com/show_bug.cgi?id=1015204) recommends adding rd.md.uuid=<UUID> but that can be alot of work if you have many volumes. In addition, if you cannot paste the UUID then it is hard to type.

To automatically enable md and luks detection, add “rd.auto=1” to the kernel command line. You can see other command line options in the dracut documentation here: https://www.man7.org/linux/man-pages/man7/dracut.cmdline.7.html

Force Docker to Boot Container into One Program

Specifying the Program that Docker Should Launch at Start Time

Sometimes if you are working with a container that gets stuck in a boot loop you need to force it to start a specific application for debugging purposes. We had this problem using the Dropbox container that was build by  janeczku.

It works great most of the time, but during one of the Dropbox updates, the container would not start so it would start and stop rapidly. This is a persistent container that comes up each time the server boots so we need to start it into something like `sleep 30m` so that we can run `docker -it exec dropbox /bin/bash` and inspect to see what the problem is.

Modifying the Configuration

In /var/lib/dropbox/<hash>/config.v2.json you will see an XML file similar to the one below, but notably, it has not been pretty printed as we have done for you. Somewhere in the list you will find the “Entrypoint” setting. Our system came with this set as “Entrypoint” : [ “/root/run” ], but /root/run is the script that is exiting and causing the container to boot loop. For our example, we have moved the “Entrypoint” line in our config at the top so you can see it, though yours can be anywhere in the file. Note that the array is the command to run followed by its list of arguments and we set it to /bin/sleep 30m as you can see below so that we can log into the container and get a bash prompt.

Note that the Docker service needs to be stopped before modifying the config file. In our case there was only one container so stopping the service was not an issue; if you have multiple containers then you may need to find a way to modify the config so that Docker will accept it without a restart—and if you do find out how to do that please post it in the comments below.

I hope this works for you, we searched all over the place and had trouble finding these configuration details.

{
   "Entrypoint" : [
      "/bin/sleep",
      "30m"
   ],
   "NetworkSettings" : {
      "SecondaryIPAddresses" : null,
      "SandboxID" : "cdb37ab22aecc2d6bbde325c515c034f2aa3a2677f39df75c77712ebe2e9c545",
      "SecondaryIPv6Addresses" : null,
      "SandboxKey" : "/var/run/docker/netns/cdb37ab22aec",
      "LinkLocalIPv6Address" : "",
      "Bridge" : "",
      "HasSwarmEndpoint" : false,
      "Service" : null,
      "Ports" : null,
      "Networks" : {
         "bridge" : {
            "IPAMOperational" : false,
            "EndpointID" : "",
            "GlobalIPv6PrefixLen" : 0,
            "IPPrefixLen" : 0,
            "IPAMConfig" : null,
            "IPAddress" : "",
            "IPv6Gateway" : "",
            "Aliases" : null,
            "Links" : null,
            "NetworkID" : "237c33c976ab7863c1a869b2f19492ecdd4d820763b7033cc50397147b26d324",
            "MacAddress" : "",
            "GlobalIPv6Address" : "",
            "Gateway" : ""
         }
      },
      "HairpinMode" : false,
      "LinkLocalIPv6PrefixLen" : 0,
      "IsAnonymousEndpoint" : false
   },
   "SeccompProfile" : "",
   "RestartCount" : 0,
   "HostsPath" : "/var/lib/docker/containers/18ea58191394f07d288383cc66c5ea58d99c0dac8c9c5007158b9a2378d6b66e/hosts",
   "ExposedPorts" : {
      "17500/tcp" : {}
   },
   "HostnamePath" : "/var/lib/docker/containers/18ea58191394f07d288383cc66c5ea58d99c0dac8c9c5007158b9a2378d6b66e/hostname",
   "MountLabel" : "system_u:object_r:svirt_sandbox_file_t:s0:c57,c401",
   "HasBeenStartedBefore" : true,
   "Labels" : {},
   "NoNewPrivileges" : false,
   "OpenStdin" : false,
   "Hostname" : "18ea58191394",
   "Volumes" : {
      "/dbox/Dropbox" : {},
      "/dbox/.dropbox" : {}
   },
   "MountPoints" : {
      "/dbox/Dropbox" : {
         "Spec" : {
            "Target" : "/dbox/Dropbox/",
            "Type" : "bind",
            "Source" : "/data/Dropbox (GPI)/"
         },
         "RW" : true,
         "Destination" : "/dbox/Dropbox",
         "Type" : "bind",
         "Propagation" : "rprivate",
         "Source" : "/data/Dropbox (GPI)",
         "Driver" : "",
         "Name" : ""
      },
      "/dbox/.dropbox" : {
         "Spec" : {
            "Target" : "/dbox/.dropbox",
            "Type" : "volume"
         },
         "Type" : "volume",
         "RW" : true,
         "Driver" : "local",
         "Destination" : "/dbox/.dropbox",
         "Source" : "",
         "Name" : "eb96b3bab31838496f2ca3ce0b6db476aaba9c16d9b6bc0f7da3d05f1f964120"
      }
   },
   "Env" : [
      "DBOX_UID=501",
      "DBOX_GID=1011",
      "PATH=/usr/local/sbin:/usr/local/bin:/usr/sbin:/usr/bin:/sbin:/bin",
      "DEBIAN_FRONTEND=noninteractive"
   ],
   "StdinOnce" : false,
   "ArgsEscaped" : true,
   "ResolvConfPath" : "/var/lib/docker/containers/18ea58191394f07d288383cc66c5ea58d99c0dac8c9c5007158b9a2378d6b66e/resolv.conf",
   "HasBeenManuallyStopped" : false,
   "Driver" : "overlay2",
   "AttachStdout" : false,
   "User" : "root",
   "ProcessLabel" : "system_u:system_r:svirt_lxc_net_t:s0:c57,c401",
   "Cmd" : null,
   "AttachStdin" : false,
   "AttachStderr" : false,
   "SecretReferences" : null,
   "AppArmorProfile" : "",
   "ShmPath" : "/var/lib/docker/containers/18ea58191394f07d288383cc66c5ea58d99c0dac8c9c5007158b9a2378d6b66e/shm",
   "Image" : "sha256:a8964074d4f6eac2dfdbf03200c4c73d571b1ea7ad8fcb8d99b918642de2f8d2",
   "Tty" : false,
   "LogPath" : "",
   "Domainname" : "",
   "WorkingDir" : "/dbox/Dropbox",
   "OnBuild" : null,
   "Name" : "/dropbox"
}

-Eric

Apache Performance Tuning

Understanding Apache Tuning

When Apache gets flooded with connections, sometimes the server will stop responding to requests even though the CPU isn’t maxed out and the disk IO is not a problem. You can think of the limiting metrics in Apache like a onion which are ordered as follows:

ServerLimit

This is the number of Apache connections that can be established simultaneously. If you have a large connection load for static content, but there are not enough connections to service the static content, then dynamic content may get starved by serving static content. You want to make sure that your connection limit is high enough to service all connections so that static content can be served quickly.

MaxRequestWorkers

This is the maximum number of requests to the server. Any requests over this value are queued. This number should be smaller than the ServerLimit, and probably should be set to some multiple of the number of CPU cores on your system. Keep raising this value until your CPU is maxed out.

FcgidMinProcessesPerClass

If you are using FastCGI (fcgid) then there are two tuneables that you need to pay attention to. The first is the minimum number of FastCGI processes that are to be spawned when Apache starts. These are ready and waiting to handle new requests. You can set this value as low as 0, but then a new CGI process (typically PHP) will need to be spawned with the first new connection. By having them wait, they are available to service the request immediately which minimizes PHP startup time. On newer versions of PHP that support opcode caching (built-in or using something like xcache), the cache is hot in the running process.

FcgidMaxProcessesPerClass

This is the maximum limit for the number of FastCGI processes. You probably want this to be a multiple of your CPU count but small enough that you do not run out of memory. If you have plenty of memory and your CPU is not saturated, then increase the maximum limit to handle as many PHP processes as possible.

MaxConnectionsPerChild

This is the maximum number of connections a child will handle before being reaped. If child processes have memory leak issues, this will limit its impact on the server.

KeepAlive

This allows connections to persist and handle multiple requests.

KeepAliveTimeout

If KeepAlive is enabled, this sets how long (in seconds) a connection should persist. If the timeout is too long then a connection to the web server is open but not being used which will push your server connection count toward your ServerLimit. A range from 3-60 seconds is probably reasonable, but test for your configuration. If you have severe contention because of lots of contention and KeepAlive‘s are starving the server, then you can disable KeepAlive.

MaxKeepAliveRequests

If KeepAlive is enabled, this sets the maximum number of requests a single connection can handle before closing.

Timeout

This sets the maximum time (in seconds) a request can be made before it gives up and times out.

We have tuned many Apache servers, so let us know if you need help!

-Eric

Fixed Versions: Linux SACK Attack – Denial of Service

The recently published CVE-2019-11477 and CVE-2019-11478 attacks enable an attacker with access to a TCP port on your server (most everyone, including those with web or mail servers) to either:

  1. Slow it down severely
  2. Cause a kernel crash

See the NIST publication for more detail:

https://nvd.nist.gov/vuln/detail/CVE-2019-11477

Upstream distributions have released fixes for these as follows.  The 2019-11478 vulnerability is an issue as well, but the -11477 issue has higher impact so we are listing it here.  So far as I have seen, the fix for both is in the same package version so you only need to reference the -11477 articles:

Mitigation

You can mitigate this attack with iptables. If you are using fwtree, our latest release for el6 and el7 includes the mitigation (version 1.0.1-70 or newer). Of course it is best to update your kernel, but this provides a quick fix without rebooting:

# [ -d /etc/fwtree.d ] && yum install -y fwtree && systemctl reload fwtree && iptables-save | grep MITIGATIONS

You can also do it directly with iptables:

# iptables -I INPUT -p tcp --tcp-flags SYN SYN -m tcpmss --mss 1:500 -j DROP
# ip6tables -I INPUT -p tcp --tcp-flags SYN SYN -m tcpmss --mss 1:500 -j DROP

You can also disable TCP selective acks in sysctl:

# Add this to /etc/sysctl.conf
net.ipv4.tcp_sack=0

Red Hat / CentOS / Scientific Linux

Vendor security article: https://access.redhat.com/security/cve/cve-2019-11477

Fixed Versions

  • el5: not vulnerable (and EOL, so upgrade already!)
  • el6: kernel-2.6.32-754.15.3.el6
  • el7:  kernel-3.10.0-957.21.3.el7

Ubuntu

Vendor security article: https://usn.ubuntu.com/4017-1/

Fixed Versions

  • Ubuntu 19.04
    • 5.0.0.1008.8
  • Ubuntu 18.10
    • 4.18.0.22.23
  • Ubuntu 18.04 LTS
    • 4.15.0-52.56
  • Ubuntu 16.04 LTS
    • 4.15.0-52.56~16.04.1
    • 4.4.0-151.178

Debian

Vendor security article: https://security-tracker.debian.org/tracker/CVE-2019-11477

Fixed Versions

  • jessie
    • 3.16.68-2
    • 4.9.168-1+deb9u3~deb8u1
  • stretch
    • 4.9.168-1+deb9u3
  • sid
    • 4.19.37-4

SuSE

Vendor security article: https://www.suse.com/security/cve/CVE-2019-11477/

Fixed Versions

For SuSE, there are too many minor version releases to list them all here. To generalize, if you are running a newer kernel than these then you are probably okay, but double-check the vendor security article for your specific release and use case:

  • Pre SLES-15:
    • 3.12.61-52.154.1
    • 4.4.121-92.114.1
    • 4.4.180-94.97.1
    • 4.12.14-95.19.1
  • SLES 15
    • 4.12.14-150.22.1
  • Leap 15
    • 4.12.14-lp150.12.64.1

Vanilla Upstream Kernel (kernel.org)

Security patch: https://git.kernel.org/pub/scm/linux/kernel/git/davem/net.git/commit/?id=3b4929f65b0d8249f19a50245cd88ed1a2f78cff

Fixed Versions

  • 5.1.11
  • 4.19.52
  • 4.14.122
  • 4.9.182
  • 4.4.182
  • 3.16.69

[FIXED] Libvirtd QEMU / KVM monitor unexpectedly closed – failed to create chardev during live migration or virsh start

Fixing Libvirt/QEMU KVM Permission Errors in RHEL 7/CentOS 7

If you get errors like these while trying to live-migrate a virtual machine or run `virsh start`, then there is a simple fix.  If this is a live migration, the fix probably needs to be applied to the destination, but updating both sides is a good idea.

libvirtd: error : qemuMonitorIORead:610 : Unable to read from monitor: Connection reset by peer
libvirtd: error : qemuProcessReportLogError:1912 : internal error: qemu unexpectedly closed the monitor: qemu-kvm: -chardev pty,id=charserial0: Failed to create chardev
libvirtd: error : qemuMonitorIO:719 : internal error: End of file from qemu monitor

A Simple Fix

Just add this to fstab:

devpts     /dev/pts devpts     gid=5,mode=620     0 0

then remount:

mount -o remount,rw /dev/pts

-Eric

Server Security Update Best Practices

Securing the Server with Update Patches

In any environment it is important to keep systems up to date with security patches that fix vulnerabilities. In large deployments with many use cases, you may have application requirements that depend on certain versions of packages being installed and upgrading those packages could create undesired side effects. There are 3 basic ways to manage updates in this case in order to balance security patching with usability.

Before you start

In all cases it is a good idea to prioritize based on severity. Vendors typically publish how important the vulnerability is and how broad its exposure may be, and by reviewing the security notes for the update you can decide whether or not the vulnerability affects your implementation.

Always test deployment of the update in an environment intended to replicate your application requirements before applying them to production systems. If there are any problems, solving them in the test environment will make it easier to apply to production and minimize downtime. It is a good idea to schedule downtime or a maintenance window to keep you from surprising end-users with server interruption.

Keep a complete backup of your operating system or use snapshots to roll back to an earlier version in case something breaks during an update.

Update daily and follow the latest release

Updating all packages is the easiest thing to do. Unfortunately this can have problems if specific versions of software are needed, so it could break functionality.

Exclude critical packages from being updated and install all updates

This assumes that you know which packages are critical and should not be updated. By excluding those packages from the update process, the rest of the system can remain up to date. However, excluding a package from update could cause package dependencies to break. If this happens, it is likely that no package will install at all because it will not be able to install dependencies, so you will need to watch your update logs to make sure they are successful or alert on failure.

Review release information and only install packages that require security updates

This requires additional administrative overhead, but allows you to precisely update the packages that you need to maintain security while keeping all other packages at their current version. Sometimes an updated package requires a dependency; dependency chains can be quite long if the updated package is from a newer minor release of the operating system (for example, applying a version 7.6 patch to a 7.4 system). In these cases, it is sometimes possible to download the .src.rpm package and rebuild it on the earlier release platform (7.4) so that the newer rebuilt package will install cleanly in an older environment.