Thwarting the Terrapin SSH Attack (Mitigation)

The Terrapin Attack is the biggest SSH vulnerability that we have seen in decades.  Terrapin splices TCP sequence numbers to truncate SSH extension negotiation. While this is a concern, effective exploitation of this vulnerability is very difficult, and mitigation is very easy! The paper notes that AES-GCM is not vulnerable to the attack:

AES-GCM (RFC5647) is not affected by Terrapin as it does not use the SSH sequence numbers. Instead, AES-GCM uses the IV obtained from key derivation as its nonce, incrementing it after sending a binary packet. In a healthy connection, this results in the nonce being at a fixed offset from the sequence number.

The original Encrypt-and-MAC paradigma from RFC4253 protects the integrity of the plaintext, thus thwarting our attack, which yields one pseudorandom block during decryption.

This means you can simply use the AES-GCM cipher in SSL communication by configuring your hosts to default to that protocol. The AES-GCM cipher has been supported in SSH since version 6.2 so pretty much all supported distributions going back to at least 2014 have an easy mitigation.

Mitigating on the server

Newer Servers that are using `update-crypto-policies` (RHEL, Alma, Rocky, Oracle, newer Ubuntu and Debian)

Newer operating systems that provide the command update-crypto-policies, create a new policy file and activate it.  You can modify `DEFAULT` to something different if you are using a different policy, but “DEFAULT” works for most systems.

# cat /etc/crypto-policies/policies/modules/TERRAPIN.pmod
cipher@ssh = -CHACHA20*
ssh_etm = 0

# update-crypto-policies --set DEFAULT:TERRAPIN
Setting system policy to DEFAULT:TERRAPIN
Note: System-wide crypto policies are applied on application start-up.
It is recommended to restart the system for the change of policies
to fully take place.

Older Servers are not using `update-crypto-policies`

Simply add this to the bottom of /etc/ssh/sshd_config:

Match All
Ciphers aes256-gcm@openssh.com

Note that Match all is added in case you have other match blocks. Of course, if you prefer, you can exclude the Match all line and insert the cipher above any match blocks so that it is a global option.

Forcing aes256-gcm is a bit of a hammer, it certainly works but may be more than you need.  Ultimately only Chacha20 and ETM-based MACs need to be disabled, so modify this as you see fit.

Testing Server Mitigation

The Terrapin research team has published a scanning/test tool.  There is GitHub page to compile it yourself, or pre-compiled binaries for the most common OS’s are available on the releases page.  The result should look something like this.  “Strict key exchange support” is unnecessary if the vulnerable ciphers are disabled.  As you can see, it says “NOT VULNERABLE” in green:
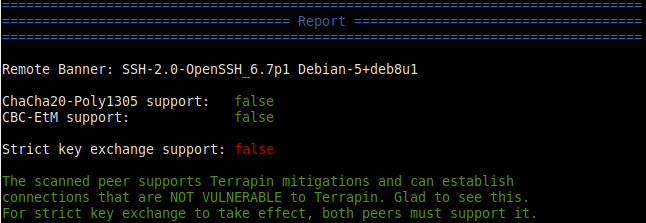
Output of a successful terrapin mitigation

Mitigating on the client

This can be done per user or system-wide.  To configure it for all users on a system, add this to the bottom of /etc/ssh/ssh_config:

Ciphers aes256-gcm@openssh.com

To configure it for a single user, add this to the top of the SSH configuration in your home directory (~/.ssh/config)

Ciphers aes256-gcm@openssh.com

Mitigating Windows SSH Clients

Unfortunately, the following Windows packages do not support AES-GCM and cannot be mitigated in this way:

If you use any of these then it would be a good idea to switch to an SSH client that supports AES-GCM.

Windows clients that support AES-GCM

Here are a few Windows clients that do support AES-GCM, in alphabetical order, by second letter:

The Fine Print

The examples above are one (very simple) way of dealing with this.  Ultimately you need to disable the ETM and ChaCha20 ciphers.  You can see what is configured in ssh as follows:

]$ ssh -Q mac|grep etm
hmac-sha1-etm@openssh.com
hmac-sha1-96-etm@openssh.com
hmac-sha2-256-etm@openssh.com
hmac-sha2-512-etm@openssh.com
hmac-md5-etm@openssh.com
hmac-md5-96-etm@openssh.com
umac-64-etm@openssh.com
umac-128-etm@openssh.com
]$ ssh -Q cipher|grep -i cha
chacha20-poly1305@openssh.com

-Eric

How to reset your root password!

From time to time I am asked how to set reset the root password on a Linux server when you get locked out. Obvious for security reasons you can’t to do this remotely, but it is pretty easy to do if you have physical access.

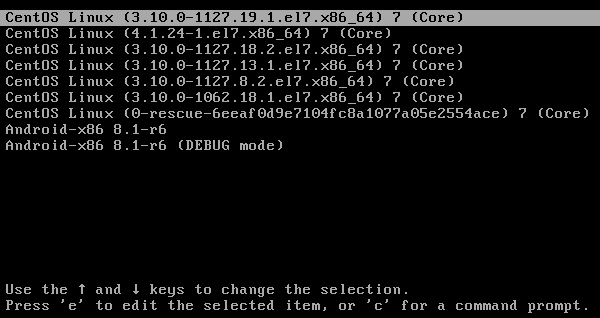
First, reboot the system and interrupt the grub bootloader that looks like this by pressing ‘e’. In this example we are booting from CentOS, but it works for pretty much any modern Linux distribution (SuSE, Debian, Ubuntu, etc), because they all use grub:

 grub bootloader interface

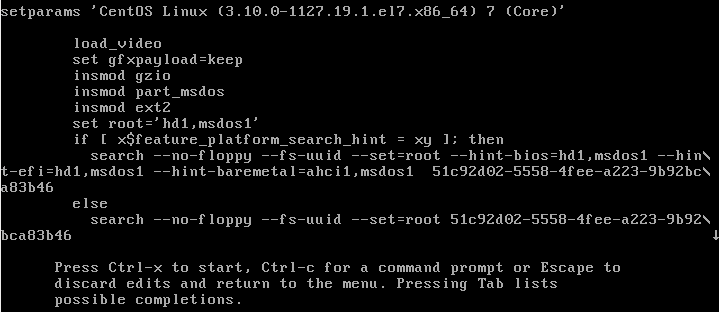
The when you press ‘e’ it will display a edit screen like this.  If you are prompted for a password when you press ‘e’ then your system administrator has disabled editing the bootloader configuration.   It is still possible to reset the root password if your bootloader his password it, but you will need to boot off of a rescue disk to do it.

 grub edit menu

Arrow down to the first section/line that starts with ‘linux16’ or ‘linuxefi’ or ‘linux’. it usually looks something like this (yes, it is a big long single line):

linux16 /vmlinuz-3.10.0-1127.19.1.el7.x86_64 root=/dev/mapper/centos-root ro rd.lvm.lv=centos/swap vconsole.font=latarcyrheb-sun16 rd.lvm.lv=centos/root crashkernel=auto vconsole.keymap=us biosdevname=0 net.ifnames=0 rd.auto=1 LANG=en_US.UTF-8

Add this to the end of that line; this is a temporary change to the bootloader that will exist only for this reboot:

init=/bin/bash

It should look something like this:

linux16 ... init=/bin/bash

Then press control-x to boot and eventually it will give you a bash prompt. When it does, run the following commands:

# mount -o remount,rw /
# passwd root
<change the password>
# mount -o remount,ro /
# echo b > /proc/sysrq-trigger

The last line will reboot the system. That should do it! Now you should be able to log in with your new root password.

-Eric

Docker or KVM: Which is Right for You?

Over the years there have been many different technologies to isolate workloads. Isolation is important for security because if one workload is compromised, and they are not isolated, then others can be affected. In today’s ecosystem, there are two predominant forms of workload isolation: containers and virtual machines.

Containers

Containers are similar to chroot jail in that all of the programs running within the container are executed in a way that they believe they have their own root file system. Linux namespaces allow the container to have its own process ID space, so `init` can be process ID 1, whereas, with chroot jails, the namespace was shared, so processes in the jail could not have a process ID of 1 since the host OS `init` process was already using process ID 1.

Containers share the same kernel and they do not have direct access to hardware resources.


Virtual Machines

Virtual machines are an emulated hardware environment provided by KVM. They boot their own kernel, have their own disks and attach network devices. If a user has full control over

a virtual machine, then they can install any operating system they wish. Because the hardware is virtualized and running a separate kernel, virtual machines provide greater isolation than containers since they do not share the same kernel. The isolation is provided by hardware optimizations implemented in silicon by CPU manufacturers. This makes

it more difficult to escape a virtual machine environment than a container environment. You might ask: But what about branch prediction attacks, like Spectre?

In this case, branch prediction attacks equally affect containers and virtual machines so we can exclude that as a consideration for choosing containers or virtual machines.

Root File System

In practice, the operating systems running within these isolation technologies both operate from their own root file systems. Traditionally this was a complete distribution installation, however, that has changed in a way that hinders security and increases the difficulty of systems administration. There is a trend of “turn-key” operating system deployments, especially in Docker. If you want a particular application, let’s say, a web server running Word Press, then you simply run a few short commands and your Word Press server is up and running. This makes it easy to install for the novice user, but there is no guarantee that the Docker environment is up to date.

Further compounding container deployment security is the fact that some containers do not have a complete root file system and administrators cannot log in at all. Some would say this is good for security, but this type of monolithic container is still subject to the increasing likelihood of new attack vectors against an aging codebase. If a vulnerability does come along, then the monolithic container can become compromised. Since it can be difficult to log into this kind of container, it is harder to inspect what is happening from within the environment– and even if you can log in, the installation is so minimal that the toolset for inspecting the problem is not available, and the deployment may be so old that even if the container includes a package manager like Yum or APT, the distribution repositories may have been archived and are no longer available without additional effort.

Container intrusions can often be inspected from the outside using a privileged installation with configurable tooling, but the security issues and increased difficulty of maintenance are a counterindication for today’s containerized counter culture.

Our recommendation is always to install a long-term support release of a well known distribution in a virtual machine instead of a container. As a full virtual machine, not only do you get increased isolation, vendor updates, and a better security life cycle, but you also get increased management tooling such as live migration, full block device disks that can be cloned and mounted on other systems or snapshotted with easy rollback.

If you must use containers for your environment, then please use a normal OS distribution, configure security updates and email notifications and centralized logging. This will go a long way to making the system maintainable in the future and save you support costs.

If you are interested in learning more, then call us for a free consultation, so we can help work out what is best for your organization.

-Eric

Fixed Versions: Linux SACK Attack – Denial of Service

The recently published CVE-2019-11477 and CVE-2019-11478 attacks enable an attacker with access to a TCP port on your server (most everyone, including those with web or mail servers) to either:

  1. Slow it down severely
  2. Cause a kernel crash

See the NIST publication for more detail:

https://nvd.nist.gov/vuln/detail/CVE-2019-11477

Upstream distributions have released fixes for these as follows.  The 2019-11478 vulnerability is an issue as well, but the -11477 issue has higher impact so we are listing it here.  So far as I have seen, the fix for both is in the same package version so you only need to reference the -11477 articles:

Mitigation

You can mitigate this attack with iptables. If you are using fwtree, our latest release for el6 and el7 includes the mitigation (version 1.0.1-70 or newer). Of course it is best to update your kernel, but this provides a quick fix without rebooting:

# [ -d /etc/fwtree.d ] && yum install -y fwtree && systemctl reload fwtree && iptables-save | grep MITIGATIONS

You can also do it directly with iptables:

# iptables -I INPUT -p tcp --tcp-flags SYN SYN -m tcpmss --mss 1:500 -j DROP
# ip6tables -I INPUT -p tcp --tcp-flags SYN SYN -m tcpmss --mss 1:500 -j DROP

You can also disable TCP selective acks in sysctl:

# Add this to /etc/sysctl.conf
net.ipv4.tcp_sack=0

Red Hat / CentOS / Scientific Linux

Vendor security article: https://access.redhat.com/security/cve/cve-2019-11477

Fixed Versions

  • el5: not vulnerable (and EOL, so upgrade already!)
  • el6: kernel-2.6.32-754.15.3.el6
  • el7:  kernel-3.10.0-957.21.3.el7

Ubuntu

Vendor security article: https://usn.ubuntu.com/4017-1/

Fixed Versions

  • Ubuntu 19.04
    • 5.0.0.1008.8
  • Ubuntu 18.10
    • 4.18.0.22.23
  • Ubuntu 18.04 LTS
    • 4.15.0-52.56
  • Ubuntu 16.04 LTS
    • 4.15.0-52.56~16.04.1
    • 4.4.0-151.178

Debian

Vendor security article: https://security-tracker.debian.org/tracker/CVE-2019-11477

Fixed Versions

  • jessie
    • 3.16.68-2
    • 4.9.168-1+deb9u3~deb8u1
  • stretch
    • 4.9.168-1+deb9u3
  • sid
    • 4.19.37-4

SuSE

Vendor security article: https://www.suse.com/security/cve/CVE-2019-11477/

Fixed Versions

For SuSE, there are too many minor version releases to list them all here. To generalize, if you are running a newer kernel than these then you are probably okay, but double-check the vendor security article for your specific release and use case:

  • Pre SLES-15:
    • 3.12.61-52.154.1
    • 4.4.121-92.114.1
    • 4.4.180-94.97.1
    • 4.12.14-95.19.1
  • SLES 15
    • 4.12.14-150.22.1
  • Leap 15
    • 4.12.14-lp150.12.64.1

Vanilla Upstream Kernel (kernel.org)

Security patch: https://git.kernel.org/pub/scm/linux/kernel/git/davem/net.git/commit/?id=3b4929f65b0d8249f19a50245cd88ed1a2f78cff

Fixed Versions

  • 5.1.11
  • 4.19.52
  • 4.14.122
  • 4.9.182
  • 4.4.182
  • 3.16.69

Redirect Directory Trailing Slash (/) with Restricted Access

Securing Apache and Maintaining Usability

First, you should always avoid .htaccess and use it as a last resort. Still, this example holds whether or not you are using .htaccess.

Let’s say you have a directory you wish to secure so that only the index and some file (test.txt) is available. Other other content in the directory should be denied. For example:

These links should load:

  • www.example.com/foo
  • www.example.com/foo/
  • www.example.com/foo/test.txt

In addition, the link without the trailing / should redirect to the link with the trailing / (from /foo to /foo/) for ease of access for your users.

These links should give a 403:

  • www.example.com/foo/bar
  • www.example.com/foo/letmein.txt

To accomplish this, you might write a .htaccess as follows:

Apache 2.2

Order allow,deny
<Files ~ ^$|^index.html$|^test.txt$>
     Order deny,allow
</Files>

Apache 2.4

Require all denied
<Files ~ ^$|^index.html$|^test.txt$>
     Require all granted
</Files>

However, you will run into a problem: The link without a trailing / will not work (www.example.com/foo) because permissions are evaluated before the mod_dir module’s DirectorySlash functionality evaluates whether or not this is a directory. While not intuitive, we also must add the directory as a file name to be allowed as follows:

Apache 2.2

Order allow,deny
<Files ~ ^foo$|^$|^index.html$|^test.txt$>
     Order deny,allow
</Files>

Apache 2.4

Require all denied
<Files ~ ^foo$|^$|^index.html$|^test.txt$>
     Require all granted
</Files>

Hopefully this will help anyone else dealing with a similar issue because it took us a lot of troubleshooting to pin this down. Here are some search terms you might try to find this post:

  • Apache 403 does not add trailing /
  • Apache does not add trailing slash
  • .htaccess deny all breaks trailing directory slash
  • .htaccess Require all denied breaks trailing directory slash

-Eric


Check Authorize.net TLS 1.2 Support: tlsv1 alert protocol version

TLS v1.0 and v1.1 to be Disabled on February 28th, 2018

As you may be aware, Authorize.net is disabling TLS v1.0 and v1.1 at the end of this month.  More information about the disablement schedule is available here.

You may begin to see errors like the following if you have not already updated your system:

error:1407742E:SSL routines:SSL23_GET_SERVER_HELLO:tlsv1 alert protocol version

We can help you solve this issue as well as provide security hardening or PCI compliance service for your server. Please call or email if we may be of service!

Checking for TLS v1.2 Support

Most modern Linux releases support TLS v1.2, however, it would be best to check to avoid a surprise. These tests should work on most any Linux version including SUSE, Red Hat, CentOS, Debian, Ubuntu, and many others.

PHP

To check your server, you can use this simple PHP script. Make sure you are running this PHP code from the same PHP executable that runs your website. For example, you might have PHP compiled from source and also have it installed as a package. In some cases, one will work and the other will not:

<?php
$ch = curl_init();

curl_setopt($ch, CURLOPT_URL, 'https://apitest.authorize.net');
curl_setopt($ch, CURLOPT_RETURNTRANSFER, true);

if (($response = curl_exec($ch)) === false) {
 $error = curl_error($ch);
 print "$error\n";
}
else {
 $httpcode = curl_getinfo($ch, CURLINFO_HTTP_CODE);
 print "TLS OK: " . strlen($response) . " bytes received ($httpcode).\n";
}

curl_close($ch);
?>

Perl

As above, make sure that you are using the same Perl interpreter that your production site is using or you can end up with a false positive/false negative test. If you get output saying “403 – Forbidden: Access is denied” then it is working because TLS connected successfully.

# perl -MLWP::UserAgent -e 'print LWP::UserAgent->new->get("https://apitest.authorize.net")->decoded_content'
Can't connect to apitest.authorize.net:443

LWP::Protocol::https::Socket: SSL connect attempt failed with unknown errorerror:1407742E:SSL routines:SSL23_GET_SERVER_HELLO:tlsv1 alert protocol version at /usr/lib/perl5/vendor_perl/5.10.0/LWP/Protocol/http.pm line 57.

OpenSSL/Generic

To check from the command line without PHP, you can use the following which shows a failed TLS negotiation:

# openssl s_client -connect apitest.authorize.net:443
CONNECTED(00000003)
30371:error:1407742E:SSL routines:SSL23_GET_SERVER_HELLO:tlsv1 alert protocol version:s23_clnt.c:605

Other Languages

If you use any language, we can help verify that your application is set up to work correctly.  Just let us know and we can work with you directly.  I hope this post helps, please comment below!

-Eric

Meltdown BUG: What about KVM/Xen/Docker/OpenVZ/LXC/PV-Xen/HyperV?

Different Variants: Meltdown and Spectre

This article discusses only Meltdown and its affect on hypervisor environments since it is the easiest to implement.  Note that Spectre is capable leaking hypervisor memory from all hypervisors running on affected processors (Intel and possibly AMD, ARM) but it is both more difficult to exploit and to mitigate.  Please read on to understand how Meltdown affects your virtualization stack:

How Meltdown Affects Virtualized Environments

Every hosting provider held their breath over the past week wondering if the as-of-yet undisclosed Intel hardware bug now released as “Meltdown” would affect their visualization stack. They all want to know: is this a hypervisor escalation!?  Here in this post we use the word “affected” meaning guest-to-hypervisor memory read access.

The Meltdown bug enables reading memory from address space represented by the same pagetable—anyone using virtual page tables is unaffected between virtual tables.  That is, Guest-to-Host pagetables are unaffected, only Guest-to-Guest or Host-to-Host, and of course Host-to-Guest since the host can already access the guest pages.

For a hosting provider this means different customer VMs on the same fully-virtualized hypervisor cannot access each others’ data—but—different users on the same guest instance can access each others’ data.  This latter part holds true for non-virtualized hardware as well: users under the same OS kernel can access each others’ data.  Thus, containers are affected!

Which Technologies Are Affected?

Fully virtualized technologies are not affected in the sense that guests cannot access host (hypervisor) memory.  However, an unprivileged guest process can still access privileged (and other unprivileged) guest process memory pages.  Container-based technologies are affected by Meltdown across container boundaries.

Affected Virtualization Technologies

Anything container based: neighbor containers can read other neighbor containers process memory.

  • Docker
  • LXC
  • OpenVZ
  • UML
  • Paravirtual Xen
  • Chroot Jails

Unaffected Virtualization Technologies

Any fully virtualized technology is unaffected.

  • KVM
  • Xen HVM
  • HyperV
  • VirtualBox (if using VT)

Solutions

  1. Update your distribution kernel if your OS distribution has released an update for CVE-2017-5715, CVE-2017-5753, and CVE-2017-5754. See this post for updated distribution kernel versions that address these CVEs: https://www.linuxglobal.com/spectre-meltdown-security-updates-distribution/
  2. If you cannot do #1, your best option is to install Linux 4.15-rc6 or one of the supported vanilla kernel patches in the link above.  On all systems.  Yes, 4.15-rc6 is a release candidate, but this kernel is receiving wide spread testing because of this bug.
  3. If this is not an option and you mostly trust the code running inside of the container, then you could run your container instances under KVM to isolate them from eachother to protect your guests and privileged container.
  4. If running Xen-PV, switch everything to Xen-HVM and hope for the best.  Many operating systems will boot in either environment unless your guest kernel was built specific to Xen PV—but there could be driver issues between the two.
  5. If you do not trust your users on a single host, then your best option is #1 above.

Remember, the only real fix is to install an updated kernel on all servers, physical or virtual.  Solutions 3and 4 only mitigate the problem since the guest is still vulnerable to interprocess memory reads.

Help!

We can help!  Just give us a call or send an email so we can make a plan and get you running secure, once again!

-Eric


Protect Your Server from Ransomware

Protect Your Business Servers from Ransomware!

The fundamental problem exploited by Ransomware is a lack of backup. At Linux Global, we protect our customers from Ransomware in a number of ways:

  • Frequent offsite backups
  • Realtime data replication for databases
  • Frequent server snapshots with offsite image backup

With these systems in place your data is safe, even in the event of your files being encrypted by Ransomware.

We can even protect your Windows server by using Linux to virtualize your infrastructure and maintain hourly snapshots with frequent offsite backups.

Call today and Ransomware-proof your infrastructure!


Dirty COW Fix: (CVE-2016-5195) Root Escalation

DirtyCOW: ptrace strikes again!

Actually, it’s not ptrace’s fault—but having ptrace disabled would mitigate the current proof of concept attacks, and possibly future attacks as well. Linus Torvalds recently fixed a get_dirty_pages race which could be used to escalate to root privileges on all kernels prior to October 13, 2016. This was not pushed into the stable kernels until October 23rd. Today, October 26th, Redhat and other vendors have started propagating these patches in downstream packages. Notably, as of this writing there is no fix for the RHEL/CentOS/Scientific Linux 5.x release, however there is a mitigation available on Redhat’s Bugzilla tracker here:
https://bugzilla.redhat.com/show_bug.cgi?id=1384344#c13

Easy Fix (mitigate) for DirtyCOW CVE-2016-5195 Root Escalation

While the Bugzilla patch above explains what needs to be done, the process is not necessarily straight-forward. This script automates the process for EL5 and derivatives, and it should work more or less on EL6, but only if your devel packages are available for your current kernel. If not, then `yum install kernel` and reboot before running this script; In the EL6 case, there is no need to run this script after a kernel update as long as you are running the latest version noted below.

As noted on the Bugzilla link, “… note that this mitigation disables ptrace functionality which debuggers and programs that inspect other processes (virus scanners) use and thus these programs won’t be operational.”

You can run the script like so:

bash <(wget -qO - https://www.linuxglobal.com/static/blog/harden-dirtycow.sh)

Of course you probably want to review the script before running it, so click here to view:

https://www.linuxglobal.com/static/blog/harden-dirtycow.sh

What is Your Exposure?

You’re only vulnerable to this if a user can execute binaries that they introduce on your server. They might install this binary by compiling it onsite (but you remove gcc, right?), or by uploading a pre-compiled binary. Fortunately this means that environments who trust their users or who have no local users are safe. The bigger problem is with shared hosting environments such as those provided by WHM/cPanel/Plesk/Webmin and others.

These are the summary versions of kernels that contain the DirtyCOW fix:

RHEL/CentOS/Scientific Linux 6.x: 2.6.32-642.6.2
RHEL/CentOS/Scientific Linux 7.x: 3.10.0-327.36.3
Ubuntu 12.04: 3.2.0-113.155
Ubuntu 14.04: 3.13.0-100.147
Ubuntu 16.04: 4.4.0-45.66
Ubuntu 16.10: 4.8.0-26.28
Debian 7: 3.2.82-1
Debian 8: 3.16.36-1+deb8u2

Vanilla kernel longterm releases (or newer) that contain the DirtyCOW fix:

4.4.26
4.1.35
3.18.44
3.16.38
3.12.66
3.10.104
3.4.113
3.2.83

Future Hardening

This is not the first root escalation that has been leveraged by ptrace functionality, as you can see with a quick search for “ptrace root escalation”. I recommend that you turn off ptrace unless you are certain that you need it. Unfortunately the best way to do this is to re-compile your kernel and exclude ptrace support, but that is not always viable. If you’re running EL7 with SELinux enforcing (Check with `getenforce` which should print “Enforcing”), you can simply run this: `setsebool -P deny_ptrace on`.

You can also compile kernel modules such as the systemtap interface used above for the EL5 patch, but of course that requires a rebuild with gcc installed every time you update your kernel. It would be great if there was something in /sys or /proc that could globally disable the sys_ptrace_enter system call, but for the moment that is not an option.

-Eric

Secure package versions by distribution for GHOST CVE-2015-0235 (Debian/Ubuntu/CentOS)

glibc Ghost

Yep.  Its a bad one.  If an attacker can get your host to do a forward name lookup of their choosing, they may be able to execute arbitrary code.  Since libc is linked to (almost) all services in Linux, all services are affected. I expect the first attacks to be against the mail service Exim which will affect all WHM/cPanel users—but that is certainly only the tip of the iceburg.  We will see aftershocks from this exploit in unexpected ways for some time to come.

Update your packages ASAP. Here’s a quick reference for the versions you should see on common distributions.  glibc 2.19 is not affected.

Reboot after the update, libc stays resident until services restart.

CentOS 5 (RHEL/Scientific Linux 5)

yum install glibc nscd:
glibc 2.5-123.el5_11.1
nscd  2.5-123.el5_11.1

CentOS 6 (RHEL/Scientific Linux 6)

yum install glibc nscd:
glibc 2.12-1.149.el6_6.5
nscd  2.12-1.149.el6_6.5

CentOS 7 (RHEL/Scientific Linux 7)

yum install glibc nscd:
glibc 2.17-55.el7_0.5
nscd  2.17-55.el7_0.5

Debian 6 (squeeze)

apt-get update; apt-get install libc6
libc6  2.11.3-4+deb6u4

Debian 7 (wheezy)

apt-get update; apt-get install libc6
libc6  2.13-38+deb7u7

Debian Testing (jessie)

apt-get update; apt-get install libc6
libc6  2.19-13

Ubuntu 10.04 LTS

apt-get update; apt-get install libc6
libc6  2.11.1-0ubuntu7.20

 Ubuntu 12.04 LTS

apt-get update; apt-get install libc6
libc6  2.15-0ubuntu10.10

Ubuntu 14.04 LTS

apt-get update; apt-get install libc6
libc6  2.19-0ubuntu6