Thwarting the Terrapin SSH Attack (Mitigation)

The Terrapin Attack is the biggest SSH vulnerability that we have seen in decades.  Terrapin splices TCP sequence numbers to truncate SSH extension negotiation. While this is a concern, effective exploitation of this vulnerability is very difficult, and mitigation is very easy! The paper notes that AES-GCM is not vulnerable to the attack:

AES-GCM (RFC5647) is not affected by Terrapin as it does not use the SSH sequence numbers. Instead, AES-GCM uses the IV obtained from key derivation as its nonce, incrementing it after sending a binary packet. In a healthy connection, this results in the nonce being at a fixed offset from the sequence number.

The original Encrypt-and-MAC paradigma from RFC4253 protects the integrity of the plaintext, thus thwarting our attack, which yields one pseudorandom block during decryption.

This means you can simply use the AES-GCM cipher in SSL communication by configuring your hosts to default to that protocol. The AES-GCM cipher has been supported in SSH since version 6.2 so pretty much all supported distributions going back to at least 2014 have an easy mitigation.

Mitigating on the server

Newer Servers that are using `update-crypto-policies` (RHEL, Alma, Rocky, Oracle, newer Ubuntu and Debian)

Newer operating systems that provide the command update-crypto-policies, create a new policy file and activate it.  You can modify `DEFAULT` to something different if you are using a different policy, but “DEFAULT” works for most systems.

# cat /etc/crypto-policies/policies/modules/TERRAPIN.pmod
cipher@ssh = -CHACHA20*
ssh_etm = 0

# update-crypto-policies --set DEFAULT:TERRAPIN
Setting system policy to DEFAULT:TERRAPIN
Note: System-wide crypto policies are applied on application start-up.
It is recommended to restart the system for the change of policies
to fully take place.

Older Servers are not using `update-crypto-policies`

Simply add this to the bottom of /etc/ssh/sshd_config:

Match All
Ciphers aes256-gcm@openssh.com

Note that Match all is added in case you have other match blocks. Of course, if you prefer, you can exclude the Match all line and insert the cipher above any match blocks so that it is a global option.

Forcing aes256-gcm is a bit of a hammer, it certainly works but may be more than you need.  Ultimately only Chacha20 and ETM-based MACs need to be disabled, so modify this as you see fit.

Testing Server Mitigation

The Terrapin research team has published a scanning/test tool.  There is GitHub page to compile it yourself, or pre-compiled binaries for the most common OS’s are available on the releases page.  The result should look something like this.  “Strict key exchange support” is unnecessary if the vulnerable ciphers are disabled.  As you can see, it says “NOT VULNERABLE” in green:
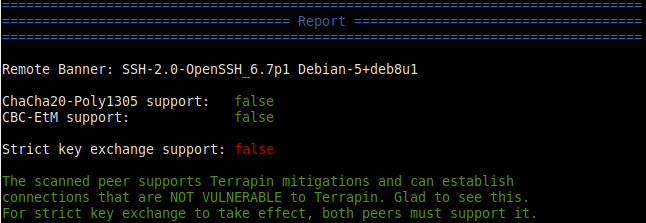
Output of a successful terrapin mitigation

Mitigating on the client

This can be done per user or system-wide.  To configure it for all users on a system, add this to the bottom of /etc/ssh/ssh_config:

Ciphers aes256-gcm@openssh.com

To configure it for a single user, add this to the top of the SSH configuration in your home directory (~/.ssh/config)

Ciphers aes256-gcm@openssh.com

Mitigating Windows SSH Clients

Unfortunately, the following Windows packages do not support AES-GCM and cannot be mitigated in this way:

If you use any of these then it would be a good idea to switch to an SSH client that supports AES-GCM.

Windows clients that support AES-GCM

Here are a few Windows clients that do support AES-GCM, in alphabetical order, by second letter:

The Fine Print

The examples above are one (very simple) way of dealing with this.  Ultimately you need to disable the ETM and ChaCha20 ciphers.  You can see what is configured in ssh as follows:

]$ ssh -Q mac|grep etm
hmac-sha1-etm@openssh.com
hmac-sha1-96-etm@openssh.com
hmac-sha2-256-etm@openssh.com
hmac-sha2-512-etm@openssh.com
hmac-md5-etm@openssh.com
hmac-md5-96-etm@openssh.com
umac-64-etm@openssh.com
umac-128-etm@openssh.com
]$ ssh -Q cipher|grep -i cha
chacha20-poly1305@openssh.com

-Eric

Docker or KVM: Which is Right for You?

Over the years there have been many different technologies to isolate workloads. Isolation is important for security because if one workload is compromised, and they are not isolated, then others can be affected. In today’s ecosystem, there are two predominant forms of workload isolation: containers and virtual machines.

Containers

Containers are similar to chroot jail in that all of the programs running within the container are executed in a way that they believe they have their own root file system. Linux namespaces allow the container to have its own process ID space, so `init` can be process ID 1, whereas, with chroot jails, the namespace was shared, so processes in the jail could not have a process ID of 1 since the host OS `init` process was already using process ID 1.

Containers share the same kernel and they do not have direct access to hardware resources.


Virtual Machines

Virtual machines are an emulated hardware environment provided by KVM. They boot their own kernel, have their own disks and attach network devices. If a user has full control over

a virtual machine, then they can install any operating system they wish. Because the hardware is virtualized and running a separate kernel, virtual machines provide greater isolation than containers since they do not share the same kernel. The isolation is provided by hardware optimizations implemented in silicon by CPU manufacturers. This makes

it more difficult to escape a virtual machine environment than a container environment. You might ask: But what about branch prediction attacks, like Spectre?

In this case, branch prediction attacks equally affect containers and virtual machines so we can exclude that as a consideration for choosing containers or virtual machines.

Root File System

In practice, the operating systems running within these isolation technologies both operate from their own root file systems. Traditionally this was a complete distribution installation, however, that has changed in a way that hinders security and increases the difficulty of systems administration. There is a trend of “turn-key” operating system deployments, especially in Docker. If you want a particular application, let’s say, a web server running Word Press, then you simply run a few short commands and your Word Press server is up and running. This makes it easy to install for the novice user, but there is no guarantee that the Docker environment is up to date.

Further compounding container deployment security is the fact that some containers do not have a complete root file system and administrators cannot log in at all. Some would say this is good for security, but this type of monolithic container is still subject to the increasing likelihood of new attack vectors against an aging codebase. If a vulnerability does come along, then the monolithic container can become compromised. Since it can be difficult to log into this kind of container, it is harder to inspect what is happening from within the environment– and even if you can log in, the installation is so minimal that the toolset for inspecting the problem is not available, and the deployment may be so old that even if the container includes a package manager like Yum or APT, the distribution repositories may have been archived and are no longer available without additional effort.

Container intrusions can often be inspected from the outside using a privileged installation with configurable tooling, but the security issues and increased difficulty of maintenance are a counterindication for today’s containerized counter culture.

Our recommendation is always to install a long-term support release of a well known distribution in a virtual machine instead of a container. As a full virtual machine, not only do you get increased isolation, vendor updates, and a better security life cycle, but you also get increased management tooling such as live migration, full block device disks that can be cloned and mounted on other systems or snapshotted with easy rollback.

If you must use containers for your environment, then please use a normal OS distribution, configure security updates and email notifications and centralized logging. This will go a long way to making the system maintainable in the future and save you support costs.

If you are interested in learning more, then call us for a free consultation, so we can help work out what is best for your organization.

-Eric

Check Authorize.net TLS 1.2 Support: tlsv1 alert protocol version

TLS v1.0 and v1.1 to be Disabled on February 28th, 2018

As you may be aware, Authorize.net is disabling TLS v1.0 and v1.1 at the end of this month.  More information about the disablement schedule is available here.

You may begin to see errors like the following if you have not already updated your system:

error:1407742E:SSL routines:SSL23_GET_SERVER_HELLO:tlsv1 alert protocol version

We can help you solve this issue as well as provide security hardening or PCI compliance service for your server. Please call or email if we may be of service!

Checking for TLS v1.2 Support

Most modern Linux releases support TLS v1.2, however, it would be best to check to avoid a surprise. These tests should work on most any Linux version including SUSE, Red Hat, CentOS, Debian, Ubuntu, and many others.

PHP

To check your server, you can use this simple PHP script. Make sure you are running this PHP code from the same PHP executable that runs your website. For example, you might have PHP compiled from source and also have it installed as a package. In some cases, one will work and the other will not:

<?php
$ch = curl_init();

curl_setopt($ch, CURLOPT_URL, 'https://apitest.authorize.net');
curl_setopt($ch, CURLOPT_RETURNTRANSFER, true);

if (($response = curl_exec($ch)) === false) {
 $error = curl_error($ch);
 print "$error\n";
}
else {
 $httpcode = curl_getinfo($ch, CURLINFO_HTTP_CODE);
 print "TLS OK: " . strlen($response) . " bytes received ($httpcode).\n";
}

curl_close($ch);
?>

Perl

As above, make sure that you are using the same Perl interpreter that your production site is using or you can end up with a false positive/false negative test. If you get output saying “403 – Forbidden: Access is denied” then it is working because TLS connected successfully.

# perl -MLWP::UserAgent -e 'print LWP::UserAgent->new->get("https://apitest.authorize.net")->decoded_content'
Can't connect to apitest.authorize.net:443

LWP::Protocol::https::Socket: SSL connect attempt failed with unknown errorerror:1407742E:SSL routines:SSL23_GET_SERVER_HELLO:tlsv1 alert protocol version at /usr/lib/perl5/vendor_perl/5.10.0/LWP/Protocol/http.pm line 57.

OpenSSL/Generic

To check from the command line without PHP, you can use the following which shows a failed TLS negotiation:

# openssl s_client -connect apitest.authorize.net:443
CONNECTED(00000003)
30371:error:1407742E:SSL routines:SSL23_GET_SERVER_HELLO:tlsv1 alert protocol version:s23_clnt.c:605

Other Languages

If you use any language, we can help verify that your application is set up to work correctly.  Just let us know and we can work with you directly.  I hope this post helps, please comment below!

-Eric